Build Your Website using Notion
A few weeks ago when I started this new phase of blogging, I promised you all a post about how to set up your own website on Notion. I haven't forgotten! Here it is, friends!
This post has the information you need to create a website with Notion, either for free with Notion's domain or for the cost of your domain name if you want your own, and how to add forms, a live chat, analytics, and redirects to that page. It’s a bit more technical in nature and took me longer to write as such.
What is Notion again?
If you’re not familiar with Notion, Notion is an incredible notes app! You can use it to manage your life, plan travel, document projects, organize your team, and much more. You can read my full review of it here: Notion Review
Notion gives you the option to publicly share your notes, which has led many people, including myself, to use it as a website. This blog is, in fact, a note shared from my notes app. Compared to other options, at least, this is very easy to do, and today I’m going to give you all the details on how to do it yourself.
Who is this for?
If you want to set up an easy blog, or a simple website for your small business to direct people to for more information, but you don't want the time and expense of building a full-fledged web page, this this is for you!
If you want the website to be a source of income, this is not for you.
Here's why I say that: Notion pages, in their current form, are not designed for search engine optimization (SEO) or monetization through ad revenue, and load just slowly enough that a casual viewer might leave before the page has even opened. Thus, if you want people to do a Google search, find your page, and bring in advertising money or purchase your service, Notion isn't the way to go. Chances are, though, if you've found a way to monetize your website then it will pay for itself, and you've probably already built everything and aren't reading this in the first place.
Initial Criteria
I'll give a few different tips that will help you get started with a simple page for free, connect your domain to it for just the price of the domain, and make some very basic changes with Javascript adjust the styles or add analytics or chat functions to the page.
Notion Account
Before we get started, though, you will need a Notion account, if you don't have one already. You can make an account for free at Notion.so, with the option of paying $4 a month for a pro account with some additional features. If you're a student or educator, be sure to take advantage of their free pro account offer by signing up with your .edu email address. If you haven't used Notion yet, take a few minutes to explore and check out the tips in my previous post, Notion Review
Create and Share Your Content
Now that you have a Notion account, create a page, put the content you want people to see on it, and click the share button in the top right corner. Toggle on “Share on the web” and adjust the settings however you like. For mine, I’ve turned on “Search engine indexing” and turned everything else off. For a totally free website, copy the page link and share it, easy as that!
Option 1: Share your page as is (free)
The first option you have at this point is just to copy and share the URL to the Notion page as it is. Click Share > Copy Link, and you're good to go.
The URL to the Notion page, however, is rather ugly. The URL for this page, for example, is [https://www.notion.so/Build-Your-Personal-Website-using-Notion-c1e393e8f5ed4dcead28914bdd1a47f7](https://www.notion.so/Build-Your-Personal-Website-using-Notion-c1e393e8f5ed4dcead28914bdd1a47f7) That's a bit long to put on a business card.
To make the URL shorter, a couple good options are a URL shortener or a QR code.
URL Shortener
A URL shortener will not make the URL look nicer, but it will make it shorter, so it's easier to type. A popular one is bitly, which shortens the link to this page down to bit.ly/3fYEXcB. That's a little easier to share on a print. When you go to the shortened link it will simply redirect you to the longer one.
Obviously the user still has to type in the link, and there are a few people who don't trust a shortened URL since they can't tell where it's taking them, but overall this is a good option and quite easy.
Bitly | Custom URL Shortener, Link Management & Branded Links
QR Code
I’m a big fan of QR codes, personally. Now, I’ll admit that it wasn’t that long ago that I didn’t like them. I had an old iPhone 4S until I graduated college a year and a half ago, which required me to have a separate QR code app, and it was just too much trouble. But now that I have a new phone I can just open the iOS camera app and scan it, which is super easy. Given that people are on a variety of devices and some may prefer to type a URL, I would recommend combining this option with the one above, putting the URL in small text underneath the QR code.
QR codes are easy to generate and easy to scan. You can make one online, at the-qrcode-generator.com. Just switch to the URL tab and paste in your link, then use the save button over the QR to save the image. You can print the QR or anything, and as an added service you can put the shortened URL underneath.
Option 2: Connect Notion to your own domain (cost of domain)
This option is the most powerful and professional, but it does cost the price of your domain name, typically $12 a year, and takes a bit more time to set up. It is, however, much cheaper than purchasing web hosting and much easier than building a website. And, if you're like me and already own a domain name, you can connect Notion to a subdomain without adding any cost.
Step 1: Buy your domain
The first thing you’ll need to do is buy your domain. You can choose whatever company you prefer for this. I got mine with my web hosting from Bluehost several years ago and I’m considering transferring it to another company at some point.
A popular option for getting domains for a low price is namecheap. Pick a URL you like, check whether it's available, and you can make the purchase. Alternatively, you can get your domain from Google Domains, or a number of other companies. Feel free to shop around for a good price. Before you purchase, make sure that the price you're getting isn't a promotional rate for the first year. If there's no fine print underneath saying the price increases later on, you're good to go.
Buy domain name - Cheap domain names from $1.37 - Namecheap
Google Domains | Register Your Domain Name - Google Domains
Redirect or Rewrite
From here you have two options. You can either redirect from your domain name to your Notion page, which will give you a nice link to share, like blog.emmettbudd.com, but will still ultimately go to the Notion URL, or you can rewrite the URL so that the URL like blog.emmettbudd.com appears to be the final destination. URL rewriting produces a better end result, but it does require a little bit more effort to do for free. If you'd rather you can pay for a service to manage it for you, or you could pay me to set it up, I'd be happy to!
Rewriting comes with script injection, which gives you the option to change the title and description of the page used by search engines or shared links, connect analytics, or add a chat, and make other modifications to the page, such as changing the font. The better you understand Javascript the more you can do, in this case.
Reroute your domain to Notion
First the simple option: you can simply tell the DNS provider for your domain that when someone accesses your domain it should redirect them to your Notion page. This is easy to do, but it varies a bit depending on where you purchased the domain. You'll want to do a Google search for add redirect <your domain provider> and follow their instructions to set it up.
Do not do this if you want to do the rewriting method instead, as you'll have to undo it again!
Rewrite the Notion page URL using Fruition and CloudFlare
This is a great option that requires relatively little coding, and you don't really need to understand the code. If you don't want to attempt it yourself, I'll set it up for you for $10, or you can pay for a monthly subscription like Super to manage it. Super starts at $4/month, and has a 7-day free trial.
Really, though, this isn't that hard! I'll walk you through it, and you can reach out if you get stuck!
To do this, we’re going to use Fruition. Fruition themselves aren’t really a service in the way that Super is. There’s no app to install or organization to contact. Rather, Fruition is just a website put together by a Good Samaritan developer, Stephen, who has modified some code he found on GitHub and made detailed instructions for how to use it yourself. He’s even put together a form that will fill your information into the code for you to copy and paste.
When you're ready, head over to Fruition's website and follow their instructions! They walk you through everything, but you’re going to want to pay attention to details to make sure that it all works out right. It’s a 15 minutes process to set up, but a much longer process to debug! To help you better understand how everything works and avoid a couple pitfalls, I've written out some additional details below.
Fruition - Build Your Next Website With Notion, For Free
How Fruition works and things you should know
If you want to understand how it all works, Fruition has you set up a free account with Cloudflare, and assign them as the DNS provider for your domain. A DNS provider matches domain names to the IP addresses of the server holding the website, so this means that when someone goes to your website their computer will ultimately ask Cloudflare to tell them where the website is.
- I already have a website on this domain, what should I do?
After your account is set up, the Fruition instructions are going to have you create a worker. These are also free, unless your site gets a lot of traffic, which I’m sure at this point it doesn’t. This is going to listen to the URL you assign to it all the time, and run its code any time that URL is accessed. The code that you’ll put in, which you can copy from the Fruition website, is going to return the contents of your Notion page in response to the request on your URL. So when I go to blog.emmettbudd.com, Cloudflare will trigger my worker to run, which will go to the public Notion URL, grab all the contents of that page, and return it to my browser, which will then display it just as if the contents were hosted on my own server. Fruition’s script lets you create both the main URL and URLs for sub pages, but it will also default to using Notion’s slug behind your domain name for any pages you don’t specify by hand in the script. That’s what this blog post is doing.
Who is Cloudflare?
Cloudflare is company which provides internet services like content delivery networks (CDNs), domain name system service (DNS), distributed denial of service (DDoS) attack protection, load balancing, caching, and more. Don’t worry, you don’t need to know what all those things are. In short, Cloudflare provides services that help make websites fast and secure.
Full disclosure, I am a small-time shareholder in Cloudflare.
When you generate the worker script on Fruition, you'll see there's a Toggle Style and Script Settings button. If you expand that section, you can specify your page title and description, which will show up when someone shares a link to your page, rather than the default Notion text. You will want to put the name of your page and a short description of what it's about here. There's also a custom Google font field, which will allow you to enter the name of a font from Google Fonts, which will then become the font for your site. Below that, there is a field that says, "Paste Your Custom Script." This is where you can put the scripts for add ons like a chat window or analytics. I did these later, as I've described down below, but if you want to go ahead and add them now Fruition will automatically incorporate them into the script for you, which is helpful if you aren't familiar with coding at all.
Once you’ve generated the script and pasted that code in to Cloudflare, you’ll create a route. Make sure that you put the /* at the end of your route, otherwise it won’t work! This is also the point where you’re going to want to enter your sub domain, if you’re using one. If you’re unfamiliar, a domain is the primary level of your websites name, [emmettbudd.com](http://emmettbudd.com) in my case, while another section of the website that stands alone but has the same domain name could be put on a sub domain, like blog.emmettbudd.com.
And that’s it! If you go to your domain it should now work!
Add Additional Functions
Now that you have that set up, there are a few extra features you can add to your blog. The first of these, forms, doesn’t require any extra coding, and therefore can be done even if you’ve decided to redirect your domain name to a Notion page. The other three: chat, analytics, and redirects, are all modifications of the Cloudflare worker.
Forms
First off, forms. If you want to add a basic form to your page, such as for a contact form, survey, or email signup, there’s a beta system from Chilipepper.io to do just that. It lets you create a form that sends the results to an email address and then embed that into any Notion page using a link.
They do also give you the option to save the data to a Notion database, but doing so requires you a token from Notion to act in place of your username and password, since Notion does not yet have a public API. Given that it is somewhat unclear what level of access this grants to Chilipepper, I would not personally recommend it until they release a new version with the upcoming Notion API.
Chat
Because Fruition allows for script injection, you can add JavaScript to the head of your Notion page to create additional functionality.
A good option if you want to provide easier communication with your clients is to add a live chat on your website. There are several options for this, but I personally use HubSpot. You can use the link on the bottom of mine to get started:
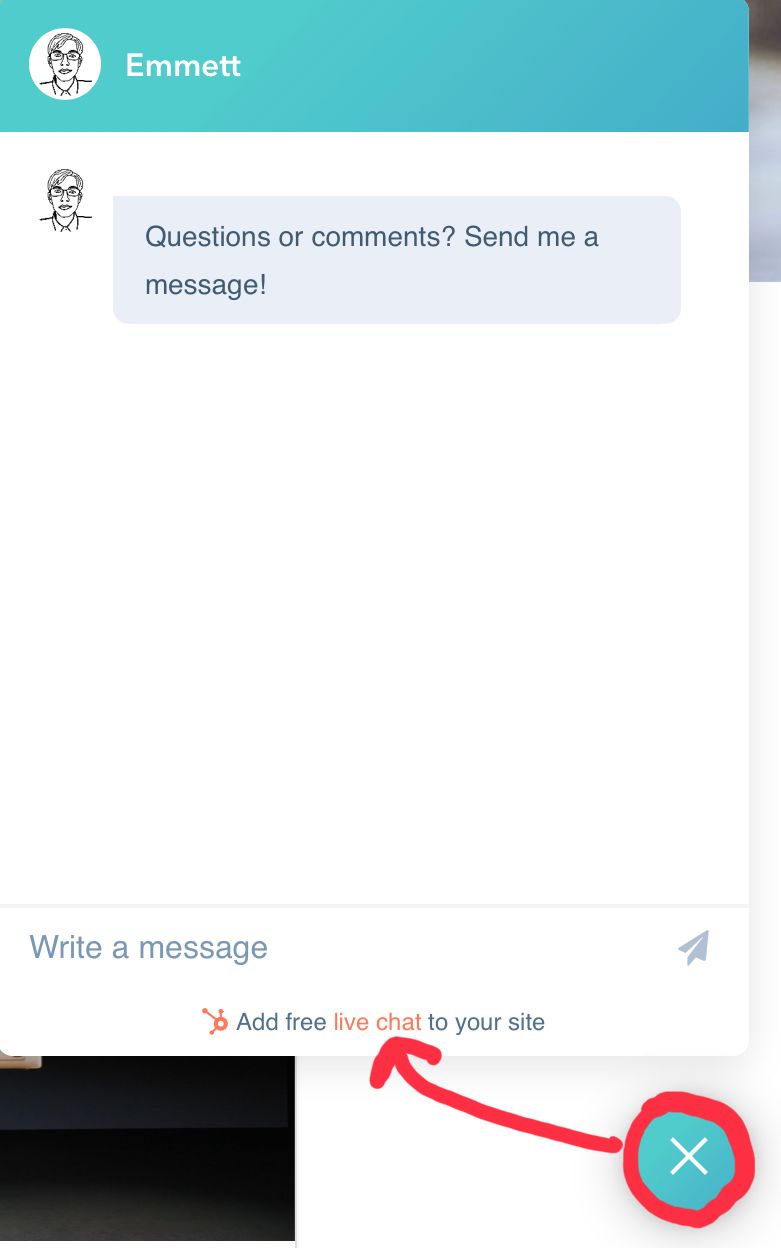
Follow the workflow on HubSpot’s website, creating a free account and setting up your chat pane, and then when you’re presented with a block of JavaScript to embed into your website, copy it and go back to your Cloudflare worker:
At the top of the script, you'll see a comment left by Fruition:
/* Step 5: enter any custom scripts you'd like */
Custom scripts, that's exactly what we have...
So, edit that line, pasting in the script tag you got from HubSpot inside the quotes, like this:
const CUSTOM_SCRIPT = `<!-- Start of HubSpot Embed Code -->
    <script .... example ...... ></script>
    <!-- End of HubSpot Embed Code -->`;
If you already had anything inside the quotes, don't worry, you can add this on. Just put some whitespace after the existing code and add the new script.
Analytics
Chances are you’ll want to know how many people visit your page, when, how they got there, et cetera, to get insights into where you should focus your efforts to maximize attention. As with chat, there are many options for setting up analytics on your webpage. I use Google Analytics, but there may be other good alternatives. You can sign in with your Google account and set up your website, and then, similar to with the chat, you’ll be given a block of JavaScript to embed.
Next, this looks a lot like the chat:
Go to the edit page for your Cloudflare worker
At the top of the script, you'll see a comment left by Fruition:
/* Step 5: enter any custom scripts you'd like */
So, edit that line, pasting in the script tag you got from Google inside the quotes, like this:
const CUSTOM_SCRIPT = `<script>
            // this is where Google's code would be...
        </script>`;
If you already had anything inside the quotes, don't worry, you can add this on. Just put some whitespace after it and add the new script.
Redirects
One thing that I realized this week was that the Fruition script had the option for custom page slugs, but not the option for redirecting from one link to another. I wanted to link, [blog.emmettbudd.com/new](http://blog.emmettbudd.com/new) to the latest blog post, and be able to simply modify it whenever I added a new post, so I initially used Fruition’s slugs for this. What I realized, however, was that with that system even if you went the full page URL, which I was sharing on my Facebook, the URL in the browser would be rewritten to blog.emmettbudd.com/new, which would make it difficult to save or share the link to the page. To resolve this issue (which I did!) I had to make some changes to the code generated by Fruition to include a redirect option. The redirects will be evaluated before the rewrites, and will issue a 302 temporary redirect sending the browser to another page. If you need to do this, my code and some instructions are below:
Go to the edit page for the Cloudflare worker
Locate the /* Step 5: enter any custom scripts you'd like */ line
Below that and the custom script variable beneath it, add a bit of white space and then paste the following code:
/* Step 6: enter any redirects you would like, with the source first and destination second*/
const REDIRECTS = {
    'redirectname': 'url'
};

// Create arrays from the map of page slugs and names
const PAGE_TO_SLUG = {};
const slugs = [];
const pages = [];
Object.keys(SLUG_TO_PAGE).forEach(slug => {
    const page = SLUG_TO_PAGE[slug];
    slugs.push(slug);
    pages.push(page);
    PAGE_TO_SLUG[page] = slug;
});
The next part is a bit more tricky: scroll down until you find the following chunk of code:
} else if (slugs.indexOf(url.pathname.slice(1)) > -1) {
    const pageId = SLUG_TO_PAGE[url.pathname.slice(1)];
    return Response.redirect('https://' + MY_DOMAIN + '/' + pageId, 301);
It's going to be somewhere around line 120. You can also use cmd + F or ctrl + F to do a search.
One you've located that section, you need to add a bit of code ABOVE it. Here's the code we're going to add:
} else if (sources.indexOf(url.pathname.slice(1)) > -1) {
    // handle redirects, makes temporary 302 redirects
    return Response.redirect(destinations[sources.indexOf(url.pathname.slice(1))], 302)
The total of that area is now going to look like this:
} else if (sources.indexOf(url.pathname.slice(1)) > -1) {
    // handle redirects, makes temporary 302 redirects
    return Response.redirect(destinations[sources.indexOf(url.pathname.slice(1))], 302)
} else if (slugs.indexOf(url.pathname.slice(1)) > -1) {
    const pageId = SLUG_TO_PAGE[url.pathname.slice(1)];
    return Response.redirect('https://' + MY_DOMAIN + '/' + pageId, 301);
The new code we've added will check the URL that the worker received, see if the end of it matches one of your redirect links, and if so tell the browser to go there instead.
Back at the top, where we created step 6, inside the first set of empty quotes, add the name of the redirect you want to create. So for blog.emmettbudd.com/new, I would add new.
In the second set of empty quotes, add the URL that that will redirect to. For me, this might look like, https://blog.emmettbudd.com/Apple-Christmas-A-WWDC-Breakdown-f073743dddb04efea7d5297023e0683e. Make sure that you add the HTTPS link.
Now your code will look something like this:
const REDIRECTS = {
    'new': 'https://blog.emmettbudd.com/Apple-Christmas-A-WWDC-Breakdown-f073743dddb04efea7d5297023e0683e'
};
If you want to add more, you can add a comma and new set:
const REDIRECTS = {
    'new': 'https://blog.emmettbudd.com/Apple-Christmas-A-WWDC-Breakdown-f073743dddb04efea7d5297023e0683e',
		'google' : 'https://google.com'
};
Check and make sure everything works!
Un-Hide the Search Bar
By default, Fruition hides the portion of the navigation bar at the top of the screen containing the search box and Notion link. Personally, I did want to keep the search option, so I modified the script a bit to show it again. To do this:
Open up your Cloudflare worker
Find the lines, somewhere around 150, that look like this:
element.append(`<style>
  div.notion-topbar > div > div:nth-child(3) { display: none !important; }
  div.notion-topbar > div > div:nth-child(4) { display: none !important; }
  div.notion-topbar > div > div:nth-child(5) { display: none !important; }
  div.notion-topbar > div > div:nth-child(6) { display: none !important; }
  div.notion-topbar-mobile > div:nth-child(3) { display: none !important; }
  div.notion-topbar-mobile > div:nth-child(4) { display: none !important; }
  </style>`, {
    html: true
  })
This code is adding some CSS styling to the page which hides certain elements, four on the desktop and two on mobile. We want to show the search element again, but we'll go ahead and keep the Notion button hidden, since it's just going to try to direct people to sign in to your Notion account.
This part took me a bit of trial and error, but fortunately, I've done it for you!
The first element is the search field. The second is a divider bar, and the third and fourth are the Notion button. Following that, then, the fifth element is the search field on mobile and the sixth is the Notion button.
Therefore, we want to remove elements 1 and 5, so that the search field will not be hidden. We can just comment them out, by inclosing them in /* */, so that they'll be ignored but you can put them back later:
element.append(`<style>
/* div.notion-topbar > div > div:nth-child(3) { display: none !important; } */
div.notion-topbar > div > div:nth-child(4) { display: none !important; }
div.notion-topbar > div > div:nth-child(5) { display: none !important; }
div.notion-topbar > div > div:nth-child(6) { display: none !important; }
/* div.notion-topbar-mobile > div:nth-child(3) { display: none !important; } */
div.notion-topbar-mobile > div:nth-child(4) { display: none !important; }
</style>`, {
  html: true
})
You can just paste that code over top of yours, and then your website will have a search function!
Link Inside Pages
You can link to another location inside a Notion page by right clicking on element in the app, selecting Copy Link and then pasting that link elsewhere. If you highlight some text and click the link button, you can paste the link in the link field to create a nicely formatted link like a back to top button, for example. But you'll find that on your Fruition site this won't work quite the way you expect, instead the link will redirect you to the public Notion page from your custom URL.
Don't worry, though, this is easy to resolve! When you paste the link, just delete [https://notion.so](https://notion.so) off the beginning, leaving the page slug after the /, like: /Build-Your-Personal-Website-using-Notion-c1e393e8f5ed4dcead28914bdd1a47f7#3f7edf49839c493d80df014429722994.
Conclusion
I think that one of the strengths of Notion for websites is that it is not designed for websites. In the past I have used WordPress for my blog, as well as other website tools like SiteCore professionally. The problem with these website building tools is that they're designed for building websites. Now, my resume pretty heavily features web design, so it's not that I can't use these tools or build a site from scratch, but when I'm working on the site itself I'm not creating content. Notion isn't designed for building websites, so using it lets me be entirely in content creating mode when I'm working on my blog. Sure, you can't do nearly as much with the design, but that also means that you can just quickly create a nice looking layout for your content as you go and be done. There's no fussing around with code or writing your post somewhere else and copying it in. This method isn’t for everyone: you’ll want to consider whether this will work for you or whether you need a website. Of course, the computer world welcomes experimentation, so you can also feel free to try it and change it! But, if you’re willing to sacrifice some customization and speed, want to keep costs down, and either don’t have a lot of technical experience or just don’t want to get in to the technical side in this case, then a Notion website is a great option!